As Large Language Models (LLMs) become increasingly integrated into real-world applications, understanding and monitoring their behavior is essential. LLM observability—the practice of tracing, logging, and analyzing model interactions—enables developers to diagnose issues, optimize performance, and ensure responsible AI usage.
This blog post is the first in a series presenting a proof of concept for implementing LLM observability using Langfuse, an open-source observability platform, together with a responsive chatbot built with FastHTML. The goal is to showcase practical techniques for capturing and visualizing LLM interactions, providing valuable insights for building more reliable and transparent AI systems.
In this blog post, I demonstrate how to integrate Langfuse into a FastHTML chatbot application for enhanced observability.
The associated code is available on llm-observability.
Presentation of Langfuse
For the foundational observability layer, I selected Langfuse. Langfuse is an open-source platform specifically designed for LLM applications, offering tools to trace, debug, and analyze LLM interactions. Its capabilities allow for detailed tracking of requests, responses, latencies, token usage, and other relevant metrics. We chose Langfuse due to its open-source nature, dedicated focus on LLMs, and its promise of comprehensive tracing features. We refer to the official Langfuse documentation for more details on its features and setup. It provides features for tracing, prompt management, and evaluations:
- Tracing: Log traces with lowest level transparency to understand cost and latency. Traces include all LLM and non-LLM calls, including retrieval, embedding, API calls, and more. It supports tracking multi-turn conversations as sessions and user tracking. Traces can be captured via native SDKs for Python/JS, 50+ library/framework integrations, OpenTelemetry, or via an LLM Gateway such as LiteLLM.
- Prompt Management: Manage, version, and optimize prompts throughout the development lifecycle. Test prompts interactively in the LLM Playground, and run prompt experiments against datasets to test new prompt versions directly within Langfuse.
- Evaluations: Measure output quality and monitor production health. Langfuse provides flexible evaluation tools, including LLM-as-a-judge, user feedback, manual labeling, or custom methods. Evaluations can be run on production traces and offline datasets for systematic testing.
Langfuse is open, self-hostable, and extensible. For testing purposes, it is recommended to run Langfuse locally. It can be easily set up using Docker Compose, which simplifies the deployment process and allows for quick iterations during development. The guide from the Langfuse documentation enables users to quickly get started with a local instance. The setup involves pulling the Docker image, configuring environment variables, and running the container. This approach provides a convenient way to experiment with Langfuse’s features without needing a cloud deployment, making it ideal for development and testing scenarios.
A FastHTML Chatbot with Langfuse and Google Gemini
Why not use Streamlit ?
My initial thought was to utilize Streamlit, a popular Python library known for its ease of use in creating web applications rapidly. Streamlit is indeed very accessible for quick prototyping. However, Streamlit often relies on a full-page reload or significant re-rendering of components upon user interaction. For a dynamic, conversational interface like a chatbot, this behavior seems unnatural and can lead to a clunky user experience.
Below in Listing 1, we provide the official example of a Streamlit chatbot application.
import streamlit as st

st.title("Echo Bot")

# Initialize chat history
if "messages" not in st.session_state:
    st.session_state.messages = []

# Display chat messages from history on app rerun
for message in st.session_state.messages:
    with st.chat_message(message["role"]):
        st.markdown(message["content"])

# React to user input
if prompt := st.chat_input("What is up?"):
    # Display user message in chat message container
    st.chat_message("user").markdown(prompt)
    # Add user message to chat history
    st.session_state.messages.append({"role": "user", "content": prompt})

    response = f"Echo: {prompt}"
    # Display assistant response in chat message container
    with st.chat_message("assistant"):
        st.markdown(response)
    # Add assistant response to chat history
    st.session_state.messages.append({"role": "assistant", "content": response})
Streamlit re-runs the entire Python script from top to bottom every time the user interacts with the app (e.g., submits a message, clicks a button) or when the app reloads. To keep data between these reruns, Streamlit uses st.session_state. Without it, variables would reset on each rerun. Which means that at each reload, the entire chat history is re-rendered from the st.session_state.messages list. This can lead to a less responsive user experience, especially in a chatbot context where users expect real-time interaction. It feels counterintuitive to have to manage the chat history in a session state variable, which is not a natural way to handle dynamic content updates.
Why FastHTML?
Consequently, I shifted my focus to FastHTML. FastHTML is a newer approach/API developed by Answer AI designed for building dynamic web interfaces with potentially more granular control over updates, avoiding full-page reloads. I found a pre-existing, fully-functional chatbot example built with FastHTML. This example provided with additional extensions is a great starting point for building a responsive chatbot application. It uses FastHTML’s capabilities to create a chat interface that updates dynamically without reloading the entire page, providing a more fluid user experience.
Building a Chatbot with FastHTML, Google Gemini, and Langfuse
Below is a step by step detailed analysis of the fasthtml app. The application is built using the FastHTML web framework and leverages Google’s Gemini for its conversational AI capabilities. For observability and user feedback, it integrates with Langfuse.
Overview of Functionality
The application provides a web-based chat interface where a user can have a conversation with an AI assistant. Key features include:
- Real-time Interaction: Uses WebSockets for instant message delivery between the client and server.
- Session Management: Each user conversation is tracked in a unique session, both for the AI model’s memory and for observability tracing.
- AI Integration: Connects to the Google Gemini API to generate intelligent responses.
- LLM Observability: Integrates Langfuse to trace entire conversations, log individual AI generations (turns), and record performance metrics like token usage.
- User Feedback: Includes “thumbs up/down” buttons on AI responses, allowing users to provide feedback that is logged directly into Langfuse.
- Graceful Cleanup: Properly finalizes traces and releases resources when a user clears the chat or closes the browser tab.
Initial Setup and Configuration
This section covers the initial boilerplate: importing necessary libraries, defining constants, and setting up the basic HTML structure and styling.
# Import necessary libraries and modules.
import traceback # For formatting exception tracebacks for logging.
from typing import Literal # For creating type hints for specific string values.
import uuid # For generating unique session IDs.
from fasthtml.common import * # Core components from the FastHTML library.
from fasthtml.components import Zero_md # A specific component for rendering Markdown.
from dotenv import load_dotenv # To load environment variables from a .env file.
from google import genai # The Google Generative AI client library.
from google.genai.chats import Chat # The specific Chat object from the Google library.
from langfuse import get_client # For getting the Langfuse client instance.
from langfuse._client.span import LangfuseSpan # The Langfuse Span object for tracing.
import os # For accessing environment variables.

from langfuse.model import ModelUsage # Langfuse model for tracking token usage.

# Load environment variables from a .env file into the environment.
load_dotenv()

# --- Configuration Constants ---

# The name of the environment variable that holds the Google API key.
GOOGLE_API_KEY_ENV = "GOOGLE_API_KEY"
# The specific Google Generative AI model to be used for the chat.
GOOGLE_MODEL_NAME = "gemini-2.0-flash" # Ensure this model name is correct for your Google AI setup

# --- Langfuse Constants ---
# The name for the parent span that encompasses an entire chat conversation.
LANGFUSE_CONVERSATION_SPAN_NAME = "chat_conversation"
# The name for a generation span, representing a single turn from the language model.
LANGFUSE_GENERATION_NAME = "llm_turn"
# The name used in Langfuse for scores that come from user feedback.
LANGFUSE_SCORE_NAME = "user_feedback_score"

# Define a type alias 'Role' which can only be the string "user" or "assistant".
type Role = Literal["user", "assistant"]

# Set up the HTML headers for the application.
# This includes CSS and JavaScript for styling and functionality.
hdrs = (
    picolink, # A minimal CSS framework.
    Script(src="https://cdn.tailwindcss.com"), # Tailwind CSS for utility-first styling.
    Link(rel="stylesheet", href="https://cdn.jsdelivr.net/npm/daisyui@4.11.1/dist/full.min.css"), # DaisyUI component library for Tailwind.
    Script(type="module", src="https://cdn.jsdelivr.net/npm/zero-md@3?register"), # Zero-md for rendering markdown content on the client side.
)
This section of the code handles the initial setup and configuration for the chatbot application. It begins by importing essential libraries for web development (such as fasthtml), type hinting, unique session ID generation, environment variable management, AI integration with Google Gemini, and observability with Langfuse. The load_dotenv() function is called to securely load environment variables (like API keys) from a .env file, keeping sensitive information out of the source code. Several configuration constants are defined to centralize settings such as the Google model name, environment variable names, and Langfuse tracing identifiers, making the codebase easier to maintain and update. A Role type is specified using Python’s Literal type hint, restricting valid roles to “user” or “assistant” for improved code safety and clarity. The hdrs tuple collects all necessary CSS and JavaScript resources to be included in the HTML header, including the minimal picolink CSS, TailwindCSS for utility-first styling, daisyUI for ready-made UI components, and Zero-md for client-side Markdown rendering of chat messages.
Markdown Rendering Helper
def render_local_md(md: str) -> Zero_md:
    """Renders a markdown string using the Zero-md component.

    It injects custom CSS to override the default white background and dark text,
    allowing the markdown to inherit the styling of its container (e.g., the chat bubble).
    """
    # CSS to unset the default background and color, making it transparent.
    css = '.markdown-body {background-color: unset !important; color: unset !important;}'
    # A template to hold the custom style.
    css_template = Template(Style(css), data_append=True)
    # The Zero_md component containing the style and the markdown content.
    return Zero_md(css_template, Script(md, type="text/markdown"))
This function is a utility for rendering Markdown content within the chat interface. It uses the Zero_md component from FastHTML to convert Markdown strings into HTML. The function first defines custom CSS to override the default white background and dark text color of the Markdown, allowing it to inherit the styles of its parent container (like a chat bubble). This ensures that the rendered Markdown blends seamlessly with the chat UI. The function is drawn from Isaac Flath article.
Note that there exist other ways to render Markdown in FastHTML, see Section 6.
The SessionsManager Class
This class is the cornerstone of the application’s state management. It encapsulates all interactions with the external Google and Langfuse services, and it keeps track of individual user sessions. This design prevents global state and allows the application to handle multiple concurrent users cleanly.
class SessionsManager:
    """
    Manages all session-related states, including Google GenAI chat sessions
    and Langfuse tracing spans, mapping them by a unique session ID.
    """
    def __init__(self):
        """Initializes the SessionsManager, setting up Google and Langfuse clients."""
        # Retrieve the Google API key from environment variables.
        google_api_key = os.getenv(GOOGLE_API_KEY_ENV)
        if not google_api_key:
            raise ValueError(f"Environment variable '{GOOGLE_API_KEY_ENV}' is not set.")

         # Configure and create the Google GenAI client.
        self.google_client = genai.Client(api_key=google_api_key)

        # Check for and initialize the Langfuse client.
        required_langfuse_envs = ["LANGFUSE_PUBLIC_KEY", "LANGFUSE_SECRET_KEY", "LANGFUSE_HOST"]
        missing = [env for env in required_langfuse_envs if not os.getenv(env)]
        if missing:
            raise ValueError(f"Missing required Langfuse environment variables: {', '.join(missing)}")
        self.langfuse_client = get_client()
        # Verify that the Langfuse credentials are correct.
        if not self.langfuse_client.auth_check():
            raise RuntimeError("Failed to initialize Langfuse client. Check your environment variables.")

        # Dictionaries to store active sessions, keyed by session_id.
        self._chats: dict[str, Chat] = {} # Stores Google GenAI chat objects.
        self._conversations_spans: dict[str, LangfuseSpan] = {} # Stores Langfuse conversation spans.

    def get_google_chat_session(self, session_id: str) -> Chat:
        """
        Retrieves the Google GenAI chat session for a given session ID.
        If a session doesn't exist, it creates a new one.
        """
        if session_id not in self._chats:
            # Create a new chat session using the specified model.
            self._chats[session_id] = self.google_client.chats.create(model=GOOGLE_MODEL_NAME)
        return self._chats[session_id]

    def clear_google_chat_session(self, session_id: str) -> None:
        """Removes the Google GenAI chat session for a given session ID, effectively resetting it."""
        if session_id in self._chats:
            del self._chats[session_id]

    def get_conversation_span(self, session_id: str) -> LangfuseSpan:
        """
        Retrieves or creates the parent Langfuse span for the entire conversation.
        This span groups all related LLM turns (generations) into a single trace.
        """
        if session_id not in self._conversations_spans:
            # Start a new span (which also creates a new trace).
            self._conversations_spans[session_id] = self.langfuse_client.start_span(name=LANGFUSE_CONVERSATION_SPAN_NAME)
            # Associate the trace with the user's session ID for filtering in Langfuse.
            self._conversations_spans[session_id].update_trace(user_id=session_id)
        return self._conversations_spans[session_id]

    def end_conversation_span(self, session_id: str) -> None:
        """
        Ends the current Langfuse conversation span and ensures all buffered
        data is sent to the Langfuse server.
        """
        if session_id in self._conversations_spans:
            self._conversations_spans[session_id].end()
            del self._conversations_spans[session_id]
            self.langfuse_client.flush() # Manually flush to ensure data is sent.
The SessionsManager class is responsible for managing all session-related state and external service interactions in the chatbot application. Its constructor (__init__) ensures that all required environment variables for both Google Gemini and Langfuse are present, raising clear errors if any are missing, which helps catch configuration issues early. It initializes the Google GenAI client and the Langfuse client, and sets up two dictionaries—_chats for storing active Google chat sessions and _conversations_spans for tracking Langfuse conversation spans—each keyed by a unique session_id. The get_google_chat_session method retrieves or creates a Google chat session for a given user, maintaining conversation context across messages. Similarly, get_conversation_span retrieves or creates a top-level Langfuse span for the conversation, which acts as a parent for all LLM generations and is tagged with the session_id for traceability. The clear_google_chat_session and end_conversation_span methods handle cleanup by removing session objects from memory and, in the case of Langfuse, marking the span as complete and flushing any buffered data to ensure all observability information is sent.
Application Initialization, UI Components and Main Page
This section defines the FastHTML components that make up the user interface and initializes the FastHTML application itself.
# Initialize the FastHTML application with the defined headers and a default CSS class.
app = FastHTML(hdrs=hdrs, cls="p-4 max-w-lg mx-auto", exts="ws")

# Create a single instance of the SessionsManager to be used by the entire application.
sessions_manager = SessionsManager()


def ChatMessage(msg: str, role: Role, trace_id: str | None = None, observation_id: str | None = None) -> Div:
    """
    A component function that renders a single chat message bubble.
    """
    rendered_msg = render_local_md(msg) # Convert markdown text to a renderable component.
    # Determine bubble color based on the role (user or assistant).
    bubble_class = "chat-bubble-primary" if role == "user" else 'chat-bubble-secondary'
    # Determine bubble alignment based on the role.
    chat_class = "chat-end" if role == "user" else 'chat-start'

    feedback_buttons_html = ""

    # Only show feedback buttons for assistant messages that have tracing info.
    if role == "assistant" and trace_id and observation_id:
        feedback_container_id = f"feedback-{observation_id}"
        # Values to be sent when the user clicks the "like" button.
        vals_up = {"observation_id": observation_id, "trace_id": trace_id, "score": 1}
        # Values to be sent when the user clicks the "dislike" button.
        vals_down = {"observation_id": observation_id, "trace_id": trace_id, "score": 0}

        # Create the feedback buttons using htmx attributes for AJAX POST requests.
        feedback_buttons_html = Div(
            Button(
                "👍",
                hx_post="/score_message", hx_vals=vals_up, # POST to /score_message with 'up' values.
                hx_target=f"#{feedback_container_id}", hx_swap="outerHTML", # Replace the buttons with the response.
                cls="btn btn-xs btn-ghost"
            ),
            Button(
                "👎",
                hx_post="/score_message", hx_vals=vals_down, # POST to /score_message with 'down' values.
                hx_target=f"#{feedback_container_id}", hx_swap="outerHTML", # Replace the buttons with the response.
                cls="btn btn-xs btn-ghost"
            ),
            id=feedback_container_id,
            cls="flex space-x-1 mt-1"
        )

    # Construct the final chat message div.
    return Div(cls=f"chat {chat_class}")(
        Div(role, cls="chat-header"),
        Div(rendered_msg, cls=f"chat-bubble {bubble_class}"),
        feedback_buttons_html if feedback_buttons_html else "",
    )

def ChatInput() -> Input:
    """
    A component function that returns the chat input field.
    The `hx_swap_oob='true'` attribute allows this component to be targeted
    for an "Out of Band" swap, which is used to clear the input after a message is sent.
    """
    return Input(
        name='msg',
        id='msg-input',
        placeholder="Type a message",
        cls="input input-bordered w-full",
        hx_swap_oob='true',
        autocomplete="off",  # Disable browser's native autocomplete.
    )

# The main application route, handling GET requests to the root URL.
@app.get("/")
def index():
    """Defines the main chat page UI."""
    # The main form element that handles WebSocket communication.
    page = Form(
        ws_send=True, # Automatically sends form data over the WebSocket on submit.
        hx_ext="ws", # Enables the htmx WebSocket extension.
        ws_connect="/wscon", # The WebSocket endpoint to connect to.
    )(
        # The container where chat messages will be appended.
        Div(id="chatlist", cls="chat-box h-[73vh] overflow-y-auto"),
        # The container for the input field and buttons.
        Div(cls="flex space-x-2 mt-2")(
            Group(
                ChatInput(),
                Button("Send", cls="btn btn-primary", hx_vals='{"action": "send"}'),
                Button("Clear Chat", cls="btn btn-warning", hx_post="/clear_chat", hx_target="#chatlist", hx_swap="innerHTML", hx_include="[name='session_id']"),
                ),
        ),
        # A hidden input to store the unique session ID for this client.
        Hidden(name="session_id", id="session-id", hx_swap_oob="true", value=str(uuid.uuid4())),
    )
    # Return the page wrapped in a title.
    return Titled('Chatbot Demo', page)
The app = FastHTML(...) line creates the application instance, injecting the previously defined CSS and JavaScript resources (hdrs), applying TailwindCSS classes for layout, and enabling the HTMX WebSocket extension for real-time communication. A single SessionsManager instance is created to handle all session and external service management.
The ChatMessage function generates the HTML for each chat bubble, styling it based on the sender’s role and rendering the message content as Markdown using the render_local_md helper. For assistant messages, if tracing information is available, it conditionally adds “thumbs up/down” feedback buttons, which use HTMX attributes to send POST requests to the server and update the UI in place.
The ChatInput function creates the chat input field, using the hx_swap_oob='true' attribute to ensure the input is cleared after each message, regardless of the main target of the server response. This design provides a responsive, interactive chat interface with integrated observability and user feedback mechanisms.
The main page route is defined in the index function, which returns the initial HTML structure for the chatbot interface. This structure includes a display area for chat messages (chatlist), an input field for user messages, “Send” and “Clear Chat” buttons, and a hidden input field containing a unique session ID to track the user’s conversation. The form is configured for real-time updates using WebSocket communication, leveraging HTMX and FastHTML extensions. Specifically, the @app.get("/") decorator registers the handler for the root URL, constructing the main page with a form that connects to the /wscon WebSocket endpoint (ws_connect="/wscon") and submits data over the WebSocket (ws_send=True). The chat messages are displayed in a div with id="chatlist", while the “Clear Chat” button triggers a standard HTTP POST request, ensuring the session ID is included via hx_include="[name='session_id']". The hidden input for session_id is initialized with a placeholder value, enabling session tracking for each user.
WebSocket
The functions below handle WebSocket connections, disconnections, and message processing. They manage the lifecycle of user sessions, including session ID generation, message handling, and cleanup on disconnection.
async def on_connect(ws, send):
    """Callback function executed when a new WebSocket connection is established."""
    # Generate a new unique ID for this session.
    session_id = str(uuid.uuid4())
    # Store the session ID in the WebSocket's scope for later access.
    ws.scope['session_id'] = session_id
    # Send a new hidden input field to the client via an OOB swap.
    # This updates the `session-id` input on the client with the server-generated ID.
    await send(Hidden(name="session_id", id="session-id", value=session_id, hx_swap_oob="true"))
    print(f"SERVER: WebSocket connected. Session ID: {session_id}.")


async def on_disconnect(ws):
    """
    Callback function executed when a WebSocket connection is closed.
    This is used for cleaning up server-side resources associated with the session.
    """
    # Retrieve the session ID from the connection's scope.
    session_id = ws.scope.get('session_id', None)
    if not session_id:
        print("ERROR: WebSocket disconnect called without a session ID. Cannot clean up.")
        return
    print(f"SERVER: WebSocket disconnected for Session ID: {session_id}. Cleaning up session.")
    try:
        # Get the session objects.
        current_chat_session = sessions_manager.get_google_chat_session(session_id=session_id)
        conv_span = sessions_manager.get_conversation_span(session_id=session_id)
        # Extract the full chat history from the Google chat object.
        messages = [
            {"role": message.role, "content": getattr(message.parts[0], "text", "")}
            for message in current_chat_session.get_history()
            if hasattr(message, "role") and hasattr(message, "parts") and message.parts
        ]
        # Update the Langfuse span with the full conversation history before ending it.
        if messages and conv_span:
            conv_span.update(
                input=messages[:-1],  # All messages except the last are considered input.
                output=messages[-1],  # The final message is the output of the whole conversation.
            )
        # Clean up the session data from the manager.
        sessions_manager.clear_google_chat_session(session_id=session_id)
        sessions_manager.end_conversation_span(session_id=session_id)
        print(f"SERVER: Cleanup complete for session: {session_id}.")
    except Exception as e:
        # Log any errors that occur during the cleanup process.
        print(f"ERROR during WebSocket disconnect cleanup for Session ID: {session_id}: {e}\n{traceback.format_exc()}")


@app.ws("/wscon", conn=on_connect, disconn=on_disconnect)
async def ws_chat_handler(msg:str, ws, send):
    """
    The main WebSocket message handler. This is called every time a message is
    received from a client over the WebSocket.
    """
    # Get the session ID associated with this WebSocket connection.
    session_id = ws.scope.get('session_id', None)
    if not session_id:
        print("ERROR: WebSocket handler called without a session ID. Cannot process message.")
        return

    # Ignore empty messages from the client.
    if not msg.strip():
        await send(ChatInput()) # Resend a clean input field.
        return

    # Ensure the conversation span and chat session are ready.
    conv_span = sessions_manager.get_conversation_span(session_id=session_id)
    current_chat_session = sessions_manager.get_google_chat_session(session_id=session_id)

    # Get the trace ID for this conversation to pass to the UI for feedback.
    trace_id = conv_span.trace_id

    # --- Optimistic UI Update ---
    # Immediately send the user's message back to them so it appears in the chat list.
    await send(Div(ChatMessage(msg=msg, role="user"), hx_swap_oob='beforeend', id="chatlist"))
    # Send a new, empty input field to clear the user's input.
    await send(ChatInput())

    try:
        # Start a Langfuse generation span to trace this specific LLM call.
        with conv_span.start_as_current_generation(name=LANGFUSE_GENERATION_NAME, input=msg, model=GOOGLE_MODEL_NAME) as generation:
            # Send the user's message to the Google GenAI API.
            response = current_chat_session.send_message(msg)
            r = response.text.rstrip()  # Get the response text and clean it.

            # Create a ModelUsage object with token counts from the response metadata.
            usage = ModelUsage(
                input=response.usage_metadata.prompt_token_count,
                output=response.usage_metadata.candidates_token_count,
                total=response.usage_metadata.total_token_count,
            )
            # Update the Langfuse generation with the output and token usage.
            generation.update(output=r, usage_details=usage)
            # Get the unique ID of this generation for the feedback mechanism.
            observation_id = generation.id

        # Send the assistant's response to the client's chat list.
        await send(Div(ChatMessage(msg=r, role="assistant", trace_id=trace_id, observation_id=observation_id), hx_swap_oob='beforeend', id="chatlist"))
    except Exception as e:
        # Log the full error on the server for debugging.
        print(f"ERROR in WebSocket handler during AI call: {e}\n{traceback.format_exc()}")

        # Log the error as an "event" within the Langfuse conversation trace for observability.
        if conv_span:
            conv_span.create_event(
                name="llm_turn_error",
                level="ERROR",
                status_message=str(e),
                metadata={"traceback": traceback.format_exc()}
            )

        # Send a user-friendly error message to the chat UI.
        error_ui_msg = "Sorry, I encountered an issue processing your message. Please try again."
        await send(Div(ChatMessage(msg=error_ui_msg, role="assistant"), hx_swap_oob='beforeend', id="chatlist"))
The on_connect asynchronous function is triggered when a client establishes a WebSocket connection. It generates a unique session_id using uuid.uuid4() and stores this identifier in the WebSocket’s scope dictionary, which holds connection-specific data. The function then sends a hidden input component containing the new session ID back to the client. Thanks to the hx_swap_oob="true" attribute and a matching id, HTMX seamlessly replaces the placeholder session-id on the client side with this server-generated value.
The on_disconnect function is called when the client disconnects, such as when the browser tab is closed. This function is essential for resource cleanup. It retrieves the session_id from the WebSocket’s scope and uses the sessions_manager to access the final chat history. Before ending the session, it updates the top-level Langfuse span with the complete conversation, specifying the full input and output. This ensures that Langfuse maintains a comprehensive record of the chat. The function then calls the manager’s methods to end the span and clear the session data from memory. Wrapping this logic in a try/except block ensures that any errors during cleanup do not disrupt the server.
The @app.ws(...) decorator registers the main WebSocket handler for the /wscon endpoint and associates the on_connect and on_disconnect functions for connection lifecycle management. The handler receives the user’s message (msg), the WebSocket connection object (ws), and a send function for returning data to the client. It begins by retrieving the session_id, ignoring empty messages, and obtaining the active chat session and Langfuse span from the sessions_manager.
For immediate user feedback, the handler sends two components back to the client: the user’s message, rendered as a ChatMessage and appended to the chat list using hx_swap_oob='beforeend' and id="chatlist", and a new ChatInput() component, which clears the input field due to its hx_swap_oob='true' attribute.
The core logic for handling the AI response is wrapped in a try/except block. Within this block, a Langfuse generation span is started using a context manager, which logs the input message and model name, and automatically tracks timing. The user’s message is sent to the Google Gemini API, and the response text and token usage metadata are extracted. The generation span is then updated with the AI’s output and usage details, and the unique observation_id for this generation is retrieved from Langfuse. This ID, along with the trace_id, is used to enable the feedback buttons in the chat UI.
Finally, the AI’s response is sent to the client as a ChatMessage, including the necessary identifiers for feedback. If an error occurs during the API call, the exception is caught, logged to the server console, and an error event is created in Langfuse for observability. The user also receives a friendly error message in the chat interface.
Supporting HTTP Endpoints
These are standard HTTP endpoints that support auxiliary actions like clearing the chat and scoring messages.
@app.post("/clear_chat")
def clear_chat(session_id: str):
    """
    HTTP endpoint to handle the 'Clear Chat' button press.
    It resets the chat session on the server.
    """
    # Retrieve the current session objects.
    current_chat_session = sessions_manager.get_google_chat_session(session_id=session_id)
    conv_span = sessions_manager.get_conversation_span(session_id=session_id)

    # Extract chat history before clearing, to update the Langfuse trace.
    messages = [
        {"role": message.role, "content": getattr(message.parts[0], "text", "")}
        for message in current_chat_session.get_history()
        if hasattr(message, "role") and hasattr(message, "parts") and message.parts
    ]
    # Update the Langfuse span with the full conversation history.
    if messages and conv_span:
        conv_span.update(
            input=messages[:-1],
            output=messages[-1],
        )

    # Clear the server-side session data and end the Langfuse span.
    sessions_manager.clear_google_chat_session(session_id=session_id)
    sessions_manager.end_conversation_span(session_id=session_id)

    # Return an empty chat list (to replace the old one) and a fresh input field.
    return Div(id="chatlist", cls="chat-box h-[73vh] overflow-y-auto"), ChatInput()


@app.post("/score_message")
def score_message(trace_id: str, observation_id: str, score: int):
    """
    HTTP endpoint to handle user feedback (👍/👎).
    It logs a score in Langfuse for the specific LLM generation.
    """
    try:
        # Use the Langfuse client to create a score.
        sessions_manager.langfuse_client.create_score(
            name=LANGFUSE_SCORE_NAME,
            trace_id=trace_id, # Link the score to the correct conversation trace.
            observation_id=observation_id, # Link the score to the specific message.
            value=score, # The score value (1 for like, 0 for dislike).
            data_type="BOOLEAN", # The type of the score value.
        )
        # Ensure the score is sent immediately.
        sessions_manager.langfuse_client.flush()
        # Return a "Thanks!" message to replace the feedback buttons in the UI.
        return P("Thanks!", cls="text-xs text-success mt-1 ml-2")
    except Exception as e:
        # Log any error that occurs while trying to record the score.
        print(f"Error scoring message: {observation_id}, score: {score}, error: {e}\n{traceback.format_exc()}")
        # Also, try to log this scoring failure as an event in Langfuse for better observability.
        try:
            sessions_manager.langfuse_client.event(
                trace_id=trace_id,
                parent_observation_id=observation_id,
                name="scoring_error",
                level="ERROR",
                input={"observation_id": observation_id, "score_attempted": score},
                output={"error_message": str(e)},
                metadata={"traceback": traceback.format_exc()}
            )
            sessions_manager.langfuse_client.flush()
        except Exception as langfuse_event_err:
            print(f"CRITICAL: Failed to log scoring error to Langfuse: {langfuse_event_err}")

        # Return an error message to the user.
        return P("Error.", cls="text-xs text-error mt-1 ml-2")
The two HTTP endpoints, @app.post("/clear_chat") and @app.post("/score_message"), provide essential support for the chatbot’s user experience and observability features.
The /clear_chat endpoint is triggered when the user clicks the “Clear Chat” button. It receives the session_id from the form data and performs cleanup similar to the WebSocket disconnect logic: it finalizes the current Langfuse trace by updating it with the full conversation history, clears the server-side chat session, and ends the Langfuse span. The endpoint then returns an empty chat list (a Div with id="chatlist") to replace the current chat content, and a new ChatInput() component to clear the input field. This ensures the UI is reset for a fresh conversation.
The /score_message endpoint handles user feedback submitted via the “thumbs up” or “thumbs down” buttons on assistant messages. FastHTML automatically parses the hx-vals JSON data from the button into function arguments (trace_id, observation_id, and score). The endpoint calls sessions_manager.langfuse_client.create_score(), linking the feedback to the specific AI generation and trace in Langfuse. If the score is recorded successfully, it returns a simple “Thanks!” message, which replaces the feedback buttons in the UI to prevent repeated submissions. Robust error handling is included: if the score submission fails, the error is logged, and an error event is also attempted in Langfuse for observability. The user sees an error message in the UI if something goes wrong.
Together, these endpoints ensure that chat state can be reset cleanly and that user feedback is reliably captured and linked to the correct AI responses for later analysis in Langfuse.
Run the Chatbot Application
After all this step by step analysis of the code, let’s have fun running the chatbot application!
To run the chatbot application, please refer to the instructions in the README.
Once the Langfuse docker container is running, you can start the FastHTML application using the following command.
❯ uv run app/chat_fasthtml.py
Link: http://localhost:5001
INFO:     Will watch for changes in these directories: ['/home/nicolas/PycharmProjects/llm-observability']
INFO:     Uvicorn running on http://0.0.0.0:5001 (Press CTRL+C to quit)
INFO:     Started reloader process [201742] using WatchFiles
INFO:     Started server process [201830]
INFO:     Waiting for application startup.
INFO:     Application startup complete.
INFO:     127.0.0.1:40808 - "GET / HTTP/1.1" 200 OK
INFO:     127.0.0.1:40816 - "WebSocket /wscon" [accepted]
INFO:     connection open
INFO:     127.0.0.1:40808 - "GET /favicon.ico HTTP/1.1" 404 Not Found
SERVER: WebSocket connected. Session ID: 24a0a9ff-bf1d-467f-a7ab-c3f67ddb7d0d.
INFO:     127.0.0.1:51564 - "POST /score_message HTTP/1.1" 200 OK
INFO:     127.0.0.1:51998 - "POST /score_message HTTP/1.1" 200 OK
You observe all the logs in the terminal, including the WebSocket connection, incoming messages, and any errors that may occur during processing. The application is accessible at http://localhost:5001 and you can interact with it through a web browser.
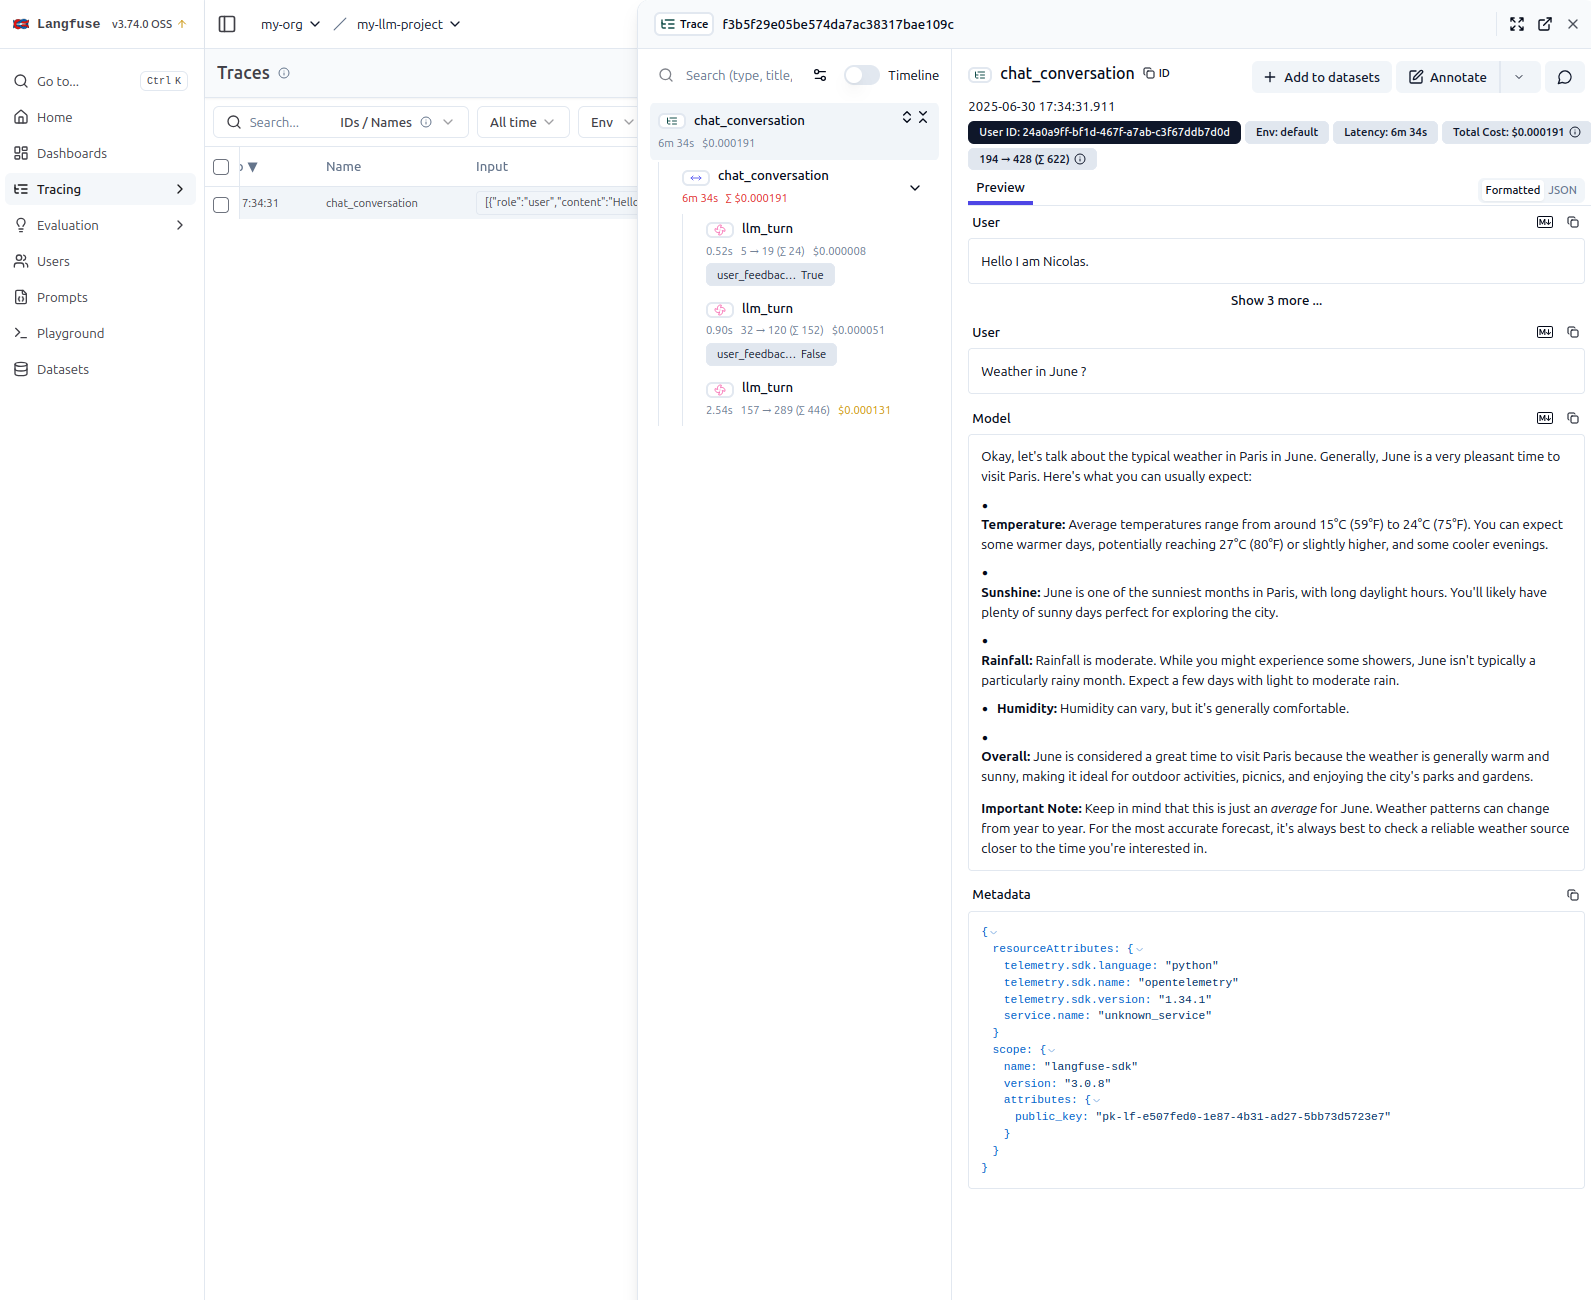
We can access the traces on langfuse platform at http://localhost:3000 (or the port you configured in the docker-compose.yml file). The traces will show the conversation history, including user messages, AI responses, and any feedback provided by users. This allows for detailed analysis of the chatbot’s performance and user interactions.
Run the Chatbot Application
After analyzing the code, it’s time to run the chatbot application and see it in action.
Prerequisites
Before starting the application, ensure you have followed the setup instructions in the project’s README. Make sure the Langfuse Docker container is up and running.
Once the prerequisites are met, start the FastHTML application from your terminal with the following command:
❯ uv run app/chat_fasthtml.pyYou should see output similar to the following, indicating the server has started successfully on port 5001 and is ready for connections:
Link: http://localhost:5001
INFO:     Will watch for changes in these directories: ['/home/nicolas/PycharmProjects/llm-observability']
INFO:     Uvicorn running on http://0.0.0.0:5001 (Press CTRL+C to quit)
INFO:     Started reloader process [201742] using WatchFiles
INFO:     Started server process [201830]
INFO:     Waiting for application startup.
INFO:     Application startup complete.
INFO:     127.0.0.1:40808 - "GET / HTTP/1.1" 200 OK
INFO:     127.0.0.1:40816 - "WebSocket /wscon" [accepted]
INFO:     connection open
SERVER: WebSocket connected. Session ID: 24a0a9ff-bf1d-467f-a7ab-c3f67ddb7d0d.
The terminal displays real-time logs for server activity, including WebSocket connections, incoming messages, and any errors.
You can interact with the chatbot by navigating to http://localhost:5001 in your web browser.
To view the observability data, open the Langfuse UI, which is typically available at http://localhost:3000 (or the port you configured in the docker-compose.yml file).
In the Langfuse dashboard, you can explore the traces generated by the application. These traces provide a detailed breakdown of each conversation, including user messages, AI responses, and any feedback provided by users. This is very useful for analyzing the chatbot’s performance and debugging interactions.
You can also test by opening multiple browser tabs or windows to simulate different users interacting with the chatbot simultaneously. Each session will generate its own trace in Langfuse, allowing you to see how the application handles concurrent conversations.
Conclusion
This FastHTML chatbot application demonstrates how to integrate Google GenAI with Langfuse for observability. It provides a responsive user interface, real-time interactions, and detailed tracing of AI-generated responses. The use of HTMX and WebSockets enhances the user experience by enabling immediate feedback and updates without full page reloads.
Appendix: Rendering Markdown in FastHTML
This Appendix compares three approaches for rendering Markdown content within a FastHTML application, each with distinct mechanisms, trade-offs, and use cases.
- Custom JavaScript: Using a library like
marked.jswith a custom script. - FastHTML Built-ins: Using the pre-packaged
MarkdownJSandHighlightJScomponents. - Web Component: Using a dedicated web component like
<zero-md>.
Approach 1: Custom JavaScript with marked.js
This method involves manually including the marked.js library and writing a small script to process elements on the page.
# Include the script in the <head> of your application
markdown_js = """
import { marked } from "https://cdn.jsdelivr.net/npm/marked/lib/marked.esm.js";
proc_htmx('.markdown', e => e.innerHTML = marked.parse(e.textContent));
"""
app = FastHTML(hdrs=(..., Script(markdown_js, type='module')))
Mechanism: A JavaScript snippet imports marked.js from a CDN. It then uses the FastHTML helper proc_htmx('.markdown', ...) to find elements with the markdown class whenever content is loaded or swapped by HTMX. For each element found, the script takes its plain text content, parses it as Markdown, and replaces the element’s innerHTML with the resulting HTML.
Usage: Place your raw Markdown string inside any container element and assign it the markdown class.
# Example: Rendering a Markdown-formatted chat message
Div("**User:** How do I render Markdown in FastHTML?\n\n**Assistant:** Use the `Div` component with the `markdown` class to display formatted content.", cls="markdown")
Styling is handled externally. You must provide your own CSS rules that target the HTML elements generated by marked.js (e.g., h1, p, ul) within the .markdown container.
/* Example external CSS */
.markdown p {
  margin-bottom: 1rem;
}
.markdown h1 {
  font-size: 2em;
}
Key Characteristics
- Global Processing: Relies on a global script that processes elements based on a CSS class.
- Simple Logic: The core mechanism is straightforward—find an element, parse its text, and replace its content.
- Separation of Concerns: Rendering logic (JS) is separate from styling (CSS).
- Manual Setup: Requires you to write and maintain the script and library import.
Approach 2: FastHTML Built-in Components
FastHTML provides convenient components, MarkdownJS and HighlightJS, that bundle the necessary client-side libraries and initialization scripts.
from fasthtml.common import *

# Include the components in the <head>
hdrs = (MarkdownJS(), HighlightJS(langs=['python', 'javascript', 'html', 'css']), )
app, rt = fast_app(hdrs=hdrs)
Mechanism
MarkdownJS(): Injects a script that automatically finds elements with a specific class (typicallymarked) and renders their text content as Markdown. This is a “batteries-included” version of the custommarked.jsapproach.HighlightJS(): Injects the Highlight.js library and a script to apply syntax highlighting to code blocks (e.g.,<pre><code>...</code></pre>). It works seamlessly withMarkdownJS, which generates the required HTML structure for fenced code blocks.
Usage: Place your raw Markdown string in a container element and assign it the marked class.
@rt('/')
def get(req):
    content = """
    ## Example
    Here is some _markdown_ with a **code block**:

    ```python
    def hello():
        print("Hello, world!")
    ```
    """
    return Titled("Markdown Example", Div(content, cls="marked"))
Styling
- Markdown: General elements (paragraphs, lists, headings) are styled by your main CSS, such as PicoCSS or custom stylesheets.
- Syntax Highlighting:
HighlightJSincludes default CSS themes for code blocks.
Key Characteristics
- Convenience: Uses pre-packaged components, reducing boilerplate for common tasks.
- Integrated Solution:
MarkdownJSandHighlightJSare designed to work together out of the box. - Client-Side Rendering: Both parsing and highlighting occur in the user’s browser.
- FastHTML Native: A well-supported and idiomatic way to handle Markdown in the FastHTML ecosystem.
Approach 3: Using the zero-md Web Component
This modern approach uses the <zero-md> web component, which encapsulates both rendering and styling.
# Register the web component in the <head>
hdrs = (
    Script(type="module", src="https://cdn.jsdelivr.net/npm/zero-md@3?register"),
)
Mechanism: zero-md is a self-contained custom HTML element (<zero-md>). It manages its own rendering lifecycle and styling, often using a Shadow DOM to prevent style conflicts. The Markdown source is passed to it inside a <script type="text/markdown"> tag.
Usage: A helper function can abstract the component’s structure, making it easy to use.
# Helper function to generate the <zero-md> component
def render_local_md(md_content_string):
    # This CSS overrides zero-md defaults to inherit color from the parent
    css = '.markdown-body { background-color: unset !important; color: unset !important; }'

    # zero-md is styled via an internal <template>
    css_template = Template(Style(css), data_append=True)

    return Zero_md(
        css_template,
        Script(md_content_string, type="text/markdown")
    )

# Example: Rendering a Markdown-formatted chat message using zero-md
sample_message = """
**User:** How do I render Markdown in Fa    stHTML?

**Assistant:** Use the `render_local_md` helper function to display formatted Markdown content in your chat UI.
"""

render_local_md(sample_message)
Styling: zero-md comes with its own default styles. You can customize them by passing a <template> containing <style> tags, as shown in the helper function. These styles are scoped to the component, preventing them from affecting the rest of your page.
Key Characteristics
- Encapsulation: Functionality and styling are self-contained, reducing the risk of CSS conflicts.
- Declarative: You use a custom HTML tag (
<zero-md>) to embed Markdown. - Rich Features: Often includes built-in syntax highlighting and theming.
Comparison of Approaches
Summary Table
| Feature | Custom marked.js |
FastHTML Built-ins | zero-md Web Component |
|---|---|---|---|
| Type | Custom JS snippet | FastHTML components | Web Component (<zero-md>) |
| Invocation | Global JS on .markdown class |
Auto-processes .marked class |
Explicit use of <zero-md> tag |
| MD Source | Element’s textContent |
Element’s textContent |
<script type="text/markdown"> |
| Styling (MD) | External CSS | External CSS | Internal defaults, customizable via <template> |
| Styling (Code) | Requires separate solution | Via HighlightJS themes |
Built-in or via <template> |
| Encapsulation | Low (global scope) | Medium (managed by components) | High (Shadow DOM) |
| Dependencies | Manual include of marked.js |
Bundled by FastHTML | External include of zero-md |
| Ease of Use | Simple but manual | Very simple and integrated | Simple with a Python helper |
Key Differences and Recommendations
The best approach depends on your project’s needs for simplicity, control, and integration.
Simplicity vs. Encapsulation: The FastHTML Built-ins offer the simplest, most integrated experience. The
zero-mdapproach provides superior encapsulation, making it ideal for complex UIs where style conflicts are a concern (e.g., when using utility-first CSS frameworks like Tailwind). The custommarked.jsapproach is a good middle-ground if you want control without external dependencies beyond the library itself.Styling and Integration: With the
marked.jsandMarkdownJSapproaches, the rendered HTML is part of the main document and is styled by global CSS. This makes global theming easy but can lead to style collisions. Withzero-md, styling is scoped, which prevents conflicts but requires learning its specific customization method (via<template>). The examplecssforzero-mdshows how to “break out” of its default theme to better blend with the surrounding page.
When to Choose Each Approach
Use the Custom
marked.jsApproach for simple scenarios where you want full control over the script and prefer to manage styling globally without adding extra FastHTML components.Use the FastHTML Built-ins (
MarkdownJS&HighlightJS) as the default, recommended choice for most FastHTML projects. It’s the most convenient, “batteries-included” solution for rendering Markdown with syntax highlighting.Use the
zero-mdWeb Component when style encapsulation is critical, especially when integrating into a complex UI with frameworks like Tailwind/DaisyUI. It is a more robust and modern solution for embedding self-contained content blocks.